
Introduction
This article is split to two key subjects, ‘customising the Read and Understood Acknowledge Reading Page’ and ‘Customise Email Templates for Read and Understood‘ which is later in this document.
Quick Links:
Customise the Read and Understood Acknowledge Reading Page
Customise Email Templates for Read and Understood
Email Templates - Replace Button Acknowledge Page link with a SharePoint Acknowledge App link
Email Template Advanced Customisations
Replace Read and Understood Acknowledge Page with Acknowledge App Page
Customise the Read and Understood Acknowledge Reading Page
When employees acknowledge reading a new or updated document version in SharePoint, if they use the link provided in the acknowledgement email, they are presented with an acknowledgement page. Alternatively, if using the Acknowledge App in either Teams/SharePoint or Outlook, then the same panel is presented for capturing the acknoweldgement request. It is possbile, through the Read and Understood App, to:
Require employees to confirm they have read the document before they acknowledge reading
Replace the logo,
Change the labels, and
Alter the text on the buttons.
Note: Customisation are also replicated in the Teams App.
To customise the Acknowledgement page:
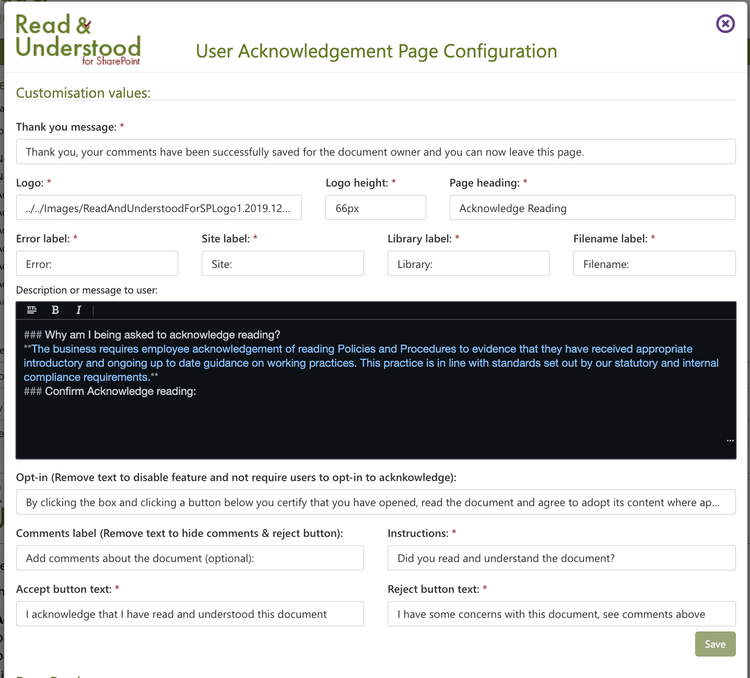
Open the Read and Understood App via Site Contents.
From the App navigation, click Email Templates
Click Acknowledgement Page from the list of templates.
A popup window will appear, each field at the top of the form represents the field you can customise and within the lower part of the form a preview displays the changes as you make them. The image below shows the input field (1) allowing you to change the Page Heading and use attributes, and the output as it would appear to employees (2).

Opt-in Message
Businesses can capture confirmation employees have opened and read documents in SharePoint before being able to acknowledge reading. This feature can be disabled by removing the text value from the the Opt-in field. New customers will have this option enabled by default with the following message:
By clicking the box and clicking a button below you certify that you have opened, read the document and agree to adopt its content where applicable to your job and that comments (if any) are your own.
Customisable Description or message to user:
It is now possible to add a message to users within the Acknowledgement Page. To make it easier to style the message text we have introduced a Markdown editor to help.
If you do not wish to display a message, simply leave the field blank. However, when constructing your message a simiple toolbar is provided:

SharePoint Document Attributes
When constructing you message it is possible to include the following SharePoint attributes:
Site - [site] - the name of the site that the document resides
Library - [library] - the name of the library the document resides.
File Name - [filename] - the name of the file excluding it’s extention.
When you using any of these attributes it is also possible to also style the, for example, bolden the text.
The Page Heading field also supports the same attributes.
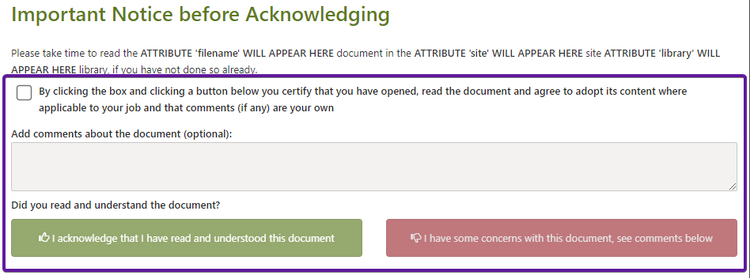
Example Styled Page
The image below shows how a styled message might appear:

Note: more information on Markdown formatting can be found here.
When editing the Acknowledgement page we provide a preview, this is how the markdown description above will preview:

When an employee clicks the link to acknowledge a document they will see the message presented on the page:

Customise Email Templates for Read and Understood
A feature of Read and Understood enables companies to customise the emails sent to employees. This can take two forms:
brand the emails using colours and images your employees are familiar with,
tailor the message and information provided to users
A Guide to Email Templates, available here, which provides more detail on the customisations and using Document Properties.
About Email Template Hierarchy
It is possible to alter the Email Templates at various places within the App. To simplify the customisation a hierarchical approach has been adopted, App > Document Selector. By customising templates at the App level means all Document selectors will inherit the those templates. However, you can then, should you choose to, tweak the templates at a documents select to make subtle changes based on the document type.
Updating the Email Templates at the App Level
Navigate to the Read and Understood App, under Site Contents. Within the app you will see the Email Templates as show in the Image below:

Within the App it's possible to customise every email template sent to users by Read and Understood. Before you begin, it is important to understand the following.
- The templates are formatted using HTML, and while Browsers will honor some formatting, mail clients may not behave in the same way. Outlook is a good example and some formatting may look different.
- When styling our attributes it is important not to alter its structure so that the App, for example, if we wanted to bolden the click here link on our acknowledgement email:
You must select the entire attribute and bolden it [a:click here:<ACKNOWLEDGE>]
At the end of the page is a good example of styling attributes and making buttons. .
The steps below will take you through the process of customising the Company Logo:
from the 'Choose a template' section, select Notification

-
Click on the 'Company Logo Here Image' provided as an example in the template:

-
from the menu click Insert > Image

-
change the 'Source' url to be an company logo from your company website.
-
if the image is too large, use the height or width to resize it. If you keep 'constrain proportions' checked then as you change either height or width the other value will automitically be recalculated.

Remove the Footer
By positioning the cursor in the bottom footer of the email, right click the mouse and click Row > Delete.
Change Text Colour
The example templates provided use text colours, which can can be changed to align with your brand.
-
select the text in the template you wish to change the text colour for

-
from the menu click the Text colour icon. You will be presented with some default colours or you can enter a custom colour:

-
click the 'custom' option and the following colour picker will appear

Note: Your company will know the accurate colour values used on your company brand, either as RGB values or HEX (#000000).
Change Border Colours of Tables
For presentation, tables have been used to layout the email template. Colours for the border colors can be changed, again to match the brand.
-
set focus on the table cell wish to set a border colour for

-
from the menu, click Table > Cell > Cell Properties.

-
from cell properties dialog, click Advanced and change the border bottom colour:

-
set a new HEX value and click OK
Save Changes
As each template is updated click the save button below the Body section of the Template. The save button is only enabled when changes to the template have been made.
Updating other Templates
Having saved the changes, select the next template you wish to change.
SharePoint Document and Read and Understood Properties
You’ll notice that the templates use SharePoint Document Properties, and those are used by Read and Understood. More information is provided on document properties in our Guide to Building and Designing Email Templates.
Email Template Advanced Customisations
You can download updated copies of our Email Templates:
Replace Acknowledge Link Button from Application to Acknowledge App on SharePoint Page
Customers using templates that already have the Acknowledge Button embedded in the Emails, can benefit from replacing the Link from our ‘App Generated Link’ to the SharePoint Site Page you have placed the Acknowledge App on. Users can then manage all their acknowledgement requests in one place.
Open the Email Template to Edit the Code:

From the Tools dropdown, click Source code:

The ‘Source code’ window will appear, find the section highlighted below:

It may be easier to copy the text (CTRL + C or CMD + C for Mac Users) and paste it into a Text Editor.
<p>
<span style="text-align: center; background-color: #5b7d0e; color: white; border: 0pt;">
<span style="display: table; background-color: #5b7d0e; color: white; border: 1pt solid #ccd5b9;">
[a:CLICK HERE TO CONFIRM ACKNOWLEDGEMENT:<ACKNOWLEDGE>^display: table; text-decoration: none; color: white; border-color: #5b7d0e; border-width: 15px 20px; border-style: solid; white-space: nowrap;]
</span>
</span>
</p>
We will replace the text above with the highlighted text below
<p>
<span style="text-align: center; background-color: #5b7d0e; color: white; border: 0pt;">
<span style="display: table; background-color: #5b7d0e; color: white; border: 1pt solid #ccd5b9;">
<a href="<PLACE YOUR LINK TO THE SITE PAGE HERE>" style="display: table; text-decoration: none; color: white; border-color: #8b2979; border-width: 15px 20px; border-style: solid; white-space: nowrap;">Acknowledge Reading</a>
</span>
</span>
</p>
Next, you need to replace <PLACE YOUR LINK TO THE SITE PAGE HERE> with the link to your SharePoint Site Page.
Repeat this process for the Acknowledge Reminder email template…
Replace Links with Button in Emails
Should you wish to, you can replace text links with more visual buttons. This is a little more complicated to achieve with email HTML than it would in say a standard web page. The image below show the simple text in the email replace with a clickable button:

Note: When updating your email templates, consider where you make the changes. If you apply the changes at a Document Selector level then this can mean you might have to repeat the process more than once. However, if you update the email templates in the Site Document Selectors then the inheriting Document Selectors inherit the template change. If you make the changes within the App (Email Templates) then all Document Selectors will inherit the button.
The HTML to create a button is as follows (attribute values to change are bold):
<span style="text-align: center; background-color: #5b7d0e; color: white; border: 0pt;">
<span style="display: table; background-color: #5b7d0e; color: white; border: 1pt solid #ccd5b9;">
[a:CLICK HERE TO CONFIRM ACKNOWLEDGEMENT:<ACKNOWLEDGE>^display: table; text-decoration: none; color: white; border-color: #5b7d0e; border-width: 15px 20px; border-style: solid; white-space: nowrap;]
</span>
</span>
<span> </span>
The background color #5b7d0e is our Green and #532371 for the button is our dark purple but you’ll want to find your corporate color hex value.
The text ‘Having read the document click here to confirm acknowledgement‘ can be altered to provide your own message.
The text within the button will be white, depending on your corporate color used for the button you may want to use darker text if the button background is a light color.
The border width values 15px 20px represent the spacing around the button. 15 is the Top and Bottom, 20 is the Left and Right. you may want to play with the values to reduce the overall height or width of the button by adjusting these values.
To update the email template the instructions below will take you through doing this at an App level. The process for doing this on a Document Selectors is identical once the Document Selector is open.
Having selected the appropriate template to update, click Tools from the menu:
From the Tools dropdown, click Source code:
The ‘Source code’ window will appear, select all the text within the box (click into the box, press CTRL+A)

With the text selected as show in the image above, click CTRL+C to copy the text on to the windows clipboard.
Open Notepad (or other prefered text editor) and paste the text in. It is much easier to read and work within the text editor.
Locate the Acknowledge Read section of the Email Template, as highlighted below.

The first thing to remove is the first row, highlighted above, that starts <th…
To make the changes we need to make easier to read; first hit return before [a... and again after …] so it looks like the image below. Also, on the end of the <td… line add colspan=”2”

Now we can replace the link with our button. With the text below selected,
[a:click here:<ACKNOWLEDGE>]
Copy the button text above so it should look like this:

Within Notepad, select all the text (CTRL+A) and copy it to the windows clipboard (CTRL+C). Paste the updated HTML Email text from Notepad into the Source code window.
Click OK to save the Source code change and we should see our button appear.

The styling of the button is not perfect at this stage but when we process the template we take the value after the ^ and convert the text into a style on the element. If you have a problem where your button doesn’t not look correct:
In the Notepad file check that for each of the Opening elements in the HTML we’ve changes that you have a closing element, for example a <span> must have a closing </span> It’s possible that when editing we the closing </td> has been removed for example
<tr style="height: 22px;">
<td style="font-family: 'Segoe UI', Calibri, 'Book Antiqua', Palatino, serif; height: 22px; width: 198.229px;" colspan="2">
<span style="display: inline-block; text-align: center; background-color: #532371; color: white; border: 0pt;">
<span style="display: inline-block; background-color: #532371; color: white; border: 0pt solid #ffffff;">
[a:Having read the document click here to confirm acknowledgement:<ACKNOWLEDGE>^display: inline-block; text-decoration: none; color: white; border-color: #532371; border-width: 15px 20px; border-style: solid; white-space: nowrap;]
</span>
</span>
</td>
</tr>
If you have to make a change, open the Source code window again and paste all the text from Notepad into the Source code window.
Ok the Source code window.

