Introduction
Using Microsoft Entra ID (formerly know as Azure Active Directory) groups can simplify how permissions are granted to a SharePoint site and also be used to by Read and Understood as a ‘To’ recipient. All members of the group will be sent an Acknowledge Reading Request. By default, however, the Read and Understood App does not have access to read Azure group membership so permissions must be granted.
Manager Direct Reports Summary Email
A feature of Read and Understood is the ability to, at the end of an acknowledgement cycle, send an email to line managers of those that particpated in the acknowledgement request. This works by using the Manager feature of Entra ID, which is also accessible via the Microsoft 365 admin center. Read and Understood, when generating the Manager Direct Reports will retrieve from Entra ID the Manager property and for every employee requested to acknowledge that document, the Manager is sent an Excel Report of all their direct reports and how they responded to the acknowledgement request. By completing the instructions below, ensuring the manager property is set and enabling the feature in the Document Selectors will generate and email the reports.
Granting the Read and Understood App Read Access to Entra ID Groups
It is important to note that some of the images provided in this document are subject to change by Microsoft as the UI undergoes regular improvements, however the functionality for this process remains.
Sending Emails using Office 365 Mailbox enabled account
Customer using a paid plan for Read and Understood will use an Office 365 mailbox to send email notifications to employees. The instructions provided below will take you through the steps of ensuring the App has permissions to send emails through an account in your company. The account you create in 365 for sending the Read and Understood emails must have and Exchange online mailbox.
Login to your Azure Portal as a global administrator
Select Microsoft Entra ID

-
Click, from the menu, 'App registrations'

-
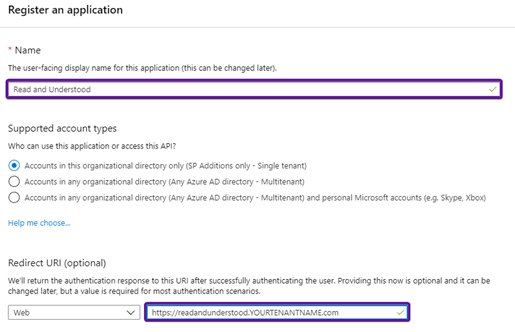
Click 'New registration' and follow the steps below:

Provide a User Friendly name for the App Registration e.g. Read and Understood
Set the Application type as Web
Set a value for the Redirect URI, it does not have to have a real endpoint, we suggest but replace YourTenantDomain with the Actual Tenant domain name https://readandinderstood.YOURTENANTDOMAIN.com
Click Create
Result: This page will appear with the App Details:

Imporant: Copy and store the Application (client) Id. (You will need the value for all Read and Understood Apps in your SharePoint tenant)

-
Next Create a Client Secret by following the steps below:
-
From the Menu click Certificates & Secrets

-
Click 'New secret'

-
Enter the Description for the New Client Secret e.g. Read and Understood

-
Set the secret to never expire

IMPORTANT: we recommend you record the expiry date and set a reminder to update it. However, the Read and Understood app will send you timely reminders before it's due to expire.
Click Add


IMPORTANT: Make sure you copy the VALUE text.
-
Click from the Menu API permissions

Click Add a Permission

-
Then select 'Microsoft APIs' followed by Microsoft Graph

-
Click Application Permissions

-
Find 'Group.Read.All' and check the option

-
Next, find 'User.Read.All' and check the option

-
Next, find 'Directory.Read.All' and check the option
Next, find 'OrgContact.Read.All' and check the option.
IMPORTANT, to support our Office Mail Plans find 'Mail.Send' and check the option.
Having made the changes click 'Add Permissions'

Now grant those permissions added to the App


Note: the image above will request consent to the Host Name of your Tenant.
Confirm Consent by clicking Yes

Result: The permissions will appear with green tickes as show below:

-
Go to Site Content and click the Read and Understood App
Click Site Administration from the menu

-
Scroll down the page and locate 'Azure Active Directory Integration with App Registration'. Paste the Application Client ID saved earlier in the process

-
Paste the Client Secret VALUE (from step 7e above) into the 'App client secret' field
The button 'Enable integration with Azure Active Directory for this tenant' will enable once the values are entered. Press the button.

A validation is performed by the App to verify the access is correctly granted, any issues will be displaed to the user.

Manager Summary
In the Microsoft 365 Admin Center, check users have the manager property set:
manager property in the Microsoft 365 Admin Center
Azure Active Directory, check users have manager property set:
Set the Manager Property in Azure Active Directory
To enable a Manager Summary Report having enabled the Azure Active Directory permissions for the Read and Understood App:
Open the Read and Understood App withing the site.
Click Manage Document Selectors in the Navigation
Select the Site you wish to update.
Select the Library you wish to update.
If you wish to enable the option for ALL Libraries enabled for Read and Understood in the Site you can update the Site Document Selector alternatively just edit the Document Selector you wish to apply the change.
Set ‘Send Manager a Direct Reports summary’ to Yes
Save and Close
Enable Manager Summary Report


